While enabling Creative Commons licences for PeerTube videos in accordance with the CC Platform Toolkit, we want to make sure that the new functionality we develop operates well with the existing PeerTube code base, fits the PeerTube design and is easy to integrate for users who want to use this feature. PeerTube’s plugin architecture lets us achieve these goals. In this post we will walk through our experience of creating a PeerTube plugin to add Creative Commons licences to PeerTube videos.
The plugin we have developed does three things:
- Update the labels used for PeerTube licences
- Display the appropriate CC licence button linked to the respective CC licence deed
- Insert machine-readable metadata, to aid with search & discovery
In this post we will roughly follow the steps from the Write a plugin/theme guide, provided as part of the PeerTube documentation:
- Find a name for your plugin
- Clone the quickstart repository
- Configure your repository
- Update README.md
- Update package.json
- Write code
- Build your plugin
- Test your plugin
- Publish your plugin on NPM
Find a name for your plugin
PeerTube Plugin names:
- can only contain lowercase letters and the hyphen (
-) sign - should start with the
peertube-plugin-prefix
We went for peertube-plugin-creative-commons.
Clone the quickstart repository
We clone the PeerTube Plugin Quickstart boilerplate code into a folder with our plugin name:
$ git clone https://framagit.org/framasoft/peertube/peertube-plugin-quickstart.git peertube-plugin-mysupername
Configure your repository
Assuming we have already set up a repository to act as origin (e.g. https://your-git-repo), we set it as the remote URL of the repo we just cloned locally.
$ cd peertube-plugin-mysupername
$ git remote set-url origin https://your-git-repo
Update README.md
We update the README.md file to include information about our plugin. See the README file in our plugin for reference.
Update package.json
Update the following package.json fields:
namedescriptionhomepageauthorbugsengine.peertube(the PeerTube version compatibility, must be>=x.y.zand nothing else)
Don’t update or remove other keys. See PeerTube’s note on how to leave staticDirs and clientScripts empty.
See the package.json in our plugin for reference.
Write code
Note: A live local environment is essential for testing your work during development, so if you’re coding along, you might want to jump to testing your plugin and come back when you have a test setup with a local PeerTube instance in place.
This is where the magic happens. It is also where the PeerTube docs come in handy, and the introduction to the concepts of hooks, static files, CSS, Server API and Client API is especially helpful review before jumping into plugin development.
The PeerTube Plugin Quickstart is a bit bare-bones and we would have liked to find at least some example code snippet sprinkled in there. Still, it gives us a nice structure and decent idea of where to start our implemention. Depending on your plugin ideas, you might also find helpful inspiration in Framasoft’s official plugins repository.
Note: in the beginning of June 2021 Framasoft/PeerTube provided an updated ‘hello world’ example plugin as part of their v4 roadmap for 2021 for “Coordination with, support and contributions to external developments (clients, plugin, etc.)”
The following sections reflect on three different goals of the Creative Commons plugin: updating licence labels, displaying CC licence buttons on video watch pages, inserting licence metadata on video watch pages.
Updating licence labels
We would like to update the licences available on a PeerTube instance. Technically, PeerTube licences are constants, which can be updated by using the videoLicenceManager.
In our plugin’s main.js we first remove the 7 existing licences, then add 7 licences using their official CC labels, as well as an 8th licence for the Public Domain Mark:
async function register ({
  registerHook,
  videoLicenceManager,
}) {

  videoLicenceManager.deleteLicence(1)
  videoLicenceManager.deleteLicence(2)
  videoLicenceManager.deleteLicence(3)
  videoLicenceManager.deleteLicence(4)
  videoLicenceManager.deleteLicence(5)
  videoLicenceManager.deleteLicence(6)
  videoLicenceManager.deleteLicence(7)

  videoLicenceManager.addLicence(1, 'CC BY 4.0')
  videoLicenceManager.addLicence(2, 'CC BY-SA 4.0')
  videoLicenceManager.addLicence(3, 'CC BY-ND 4.0')
  videoLicenceManager.addLicence(4, 'CC BY-NC 4.0')
  videoLicenceManager.addLicence(5, 'CC BY-NC-SA 4.0')
  videoLicenceManager.addLicence(6, 'CC BY-NC-ND 4.0')
  videoLicenceManager.addLicence(7, 'CC0 1.0')
  videoLicenceManager.addLicence(8, 'Public Domain Mark 1.0')

}
Displaying CC licence buttons on video watch pages
Displaying a licence button linked to the appropriate licence deed happens on the client side. PeerTube plugins package their client side functionality in client scripts, each with their own scope, so they are only loaded when needed. Since we are interested in displaying licence information along with videos on their respecitive ‘Video Watch’ pages, we define a video-watch-client-plugin.js client script with the video-watch scope in our package.json:
"clientScripts": [
  {
    "script": "client/video-watch-client-plugin.js",
    "scopes": [
      "video-watch"
    ]
  }
],
This video-watch-client-plugin.js client script has a label, image and href for each of the newly added licences, mapped to the appropriate numerical key.
const CC_VIDEO_LICENCES = {
  1: {
    label: "CC BY 4.0",
    image: "https://licensebuttons.net/l/by/4.0/80x15.png",
    href: "https://creativecommons.org/licenses/by/4.0/"
  },
  2: {
    label: "CC BY-SA 4.0",
    image: "https://licensebuttons.net/l/by-sa/4.0/80x15.png",
    href: "https://creativecommons.org/licenses/by-sa/4.0/"
  },
  3: {
    label: "CC BY-ND 4.0",
    image: "https://licensebuttons.net/l/by-nd/4.0/80x15.png",
    href: "https://creativecommons.org/licenses/by-nd/4.0/"
  },
  4: {
    label: "CC BY-NC 4.0",
    image: "https://licensebuttons.net/l/by-nc/4.0/80x15.png",
    href: "https://creativecommons.org/licenses/by-nc/4.0/"
  },
  5: {
    label: "CC BY-NC-SA 4.0",
    image: "https://licensebuttons.net/l/by-nc-sa/4.0/80x15.png",
    href: "https://creativecommons.org/licenses/by-nc-sa/4.0/"
  },
  6: {
    label: "CC BY-NC-ND 4.0",
    image: "https://licensebuttons.net/l/by-nc-nd/4.0/80x15.png",
    href: "https://creativecommons.org/licenses/by-nc-nd/4.0/"
  },
  7: {
    label: "CC0 1.0",
    image: "https://licensebuttons.net/l/zero/1.0/80x15.png",
    href: "https://creativecommons.org/publicdomain/zero/1.0/"
  },
  8: {
    label: "Public Domain Mark 1.0",
    image: "https://licensebuttons.net/l/publicdomain/80x15.png",
    href: "https://creativecommons.org/publicdomain/mark/1.0/"
  }
}
We use this data to hydrate the video object with the appropriate image and href, based on its licence.id:
registerHook({
  target: 'filter:api.video-watch.video.get.result',
  handler: video => {
    if (video.licence.id >= 1 && video.licence.id <= 8) {
      video.licence.image = CC_VIDEO_LICENCES[video.licence.id].image
      video.licence.href = CC_VIDEO_LICENCES[video.licence.id].href
    }
    return video
  }
})
To insert this info in the form of a licence button, we construct a new element for it:
const licence_span = document.createElement('span')
licence_span.className = 'cc-licence'
licence_span.innerHTML = ' • '

const licence_link = document.createElement('a')
licence_link.rel = 'license'
licence_link.href = video.licence.href
licence_link.target = '_blank'

const licence_button = document.createElement('img')
licence_button.src = video.licence.image

licence_link.appendChild(licence_button)
licence_span.appendChild(licence_link)
and insert it in the elements that we want to target. The .video-info-date-views selector matches the date & views info component below the title on both narrow and wide screens:
const video_info_date_views = document.querySelectorAll('.video-info-date-views')

for (let element of video_info_date_views) {
  element.insertAdjacentHTML('beforeend', licence_span.outerHTML)
}
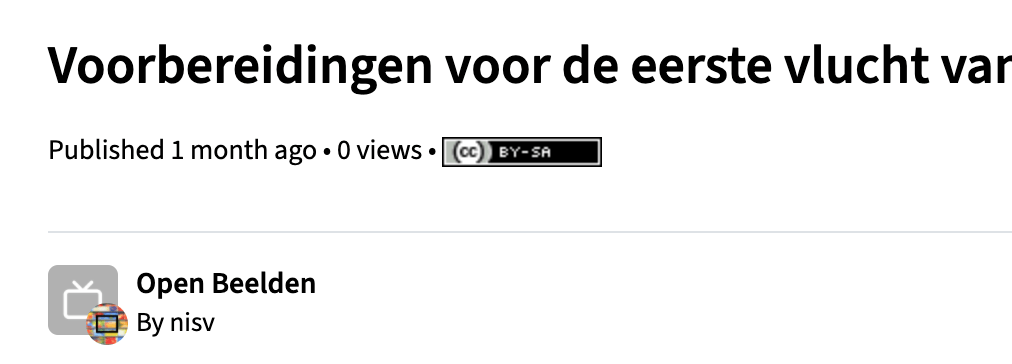
An example of the resulting licence button in action on peertube.beeldengeluid.nl:
Inserting licence metadata on video watch pages
Besides displaying a licence button, we want to add machine-readable metadata, so that CC licensed PeerTube videos can be found and indexed by external search engines.
We select our target elements:
const video_info = document.querySelectorAll('.video-info')
const video_info_name = document.querySelectorAll('.video-info-name')
const account_page_link = document.querySelector('[title="Account page"]');
and insert the appropriate metadata:
for (let element of video_info) {
  element.setAttribute('xmlns:dct', 'http://purl.org/dc/terms/')
  element.setAttribute('xmlns:cc', 'https://creativecommons.org/ns#')
}

for (let element of video_info_name) {
  element.setAttribute('property', 'dct:title')
}

if (account_page_link) {
  account_page_link.firstElementChild.setAttribute('property', 'cc:attributionName')
  account_page_link.setAttribute('rel', 'cc:attributionURL dct:creator')
  account_page_link.setAttribute('href', account_page_link.href)
}
Build your plugin
Following the PeerTube plugin guide:
If you added client scripts, you’ll need to build them using webpack.
Install webpack:
$ npm install
Add/update your files in the clientFiles array of webpack.config.js:
$ $EDITOR ./webpack.config.js
Build your client files:
$ npm run build
Test your plugin
With our our client scripts built, we can now run a local PeerTube instance and install our plugin for testing.
Follow the contributing and dependencies docs to clone the PeerTube repository, install dependencies and prepare the database.
The plugin guide neatly breaks down the next steps:
Build PeerTube (--light to only build the english language):
$ npm run build -- --light
Build the CLI:
$ npm run setup:cli
Run PeerTube (you can access to your instance on http://localhost:9000):
$ NODE_ENV=test npm start
Register the instance via the CLI:
$ node ./dist/server/tools/peertube.js auth add -u 'http://localhost:9000' -U 'root' --password 'test'
Then, you can install or reinstall your local plugin/theme by running:
$ node ./dist/server/tools/peertube.js plugins install --path /your/absolute/plugin-or-theme/path
After this final step you should get a satisfying Plugin installed logged to your console. Reloading your local PeerTube instance should now reflect the changes you have made to your plugin code!
Publish your plugin on NPM
To publish your plugin, you first need an account on NPM. Once you have an account with login credentials, you can set up your authentication for publishing. We used the modern way of using an authentication token, so we did not have to login each time.
Go in your plugin/theme directory, and run:
$ npm publish
Every time you want to publish another version of your plugin/theme, just update the version key from the package.json
and republish it on NPM.
We started with the lowest number for semantic versioning (0.0.1) for early production-ready testing of the plugin, but also to improve description, keywords, urls, etc. in package.json for a good representation of our publication. Only when we considered everything complete, we jumped to 1.0.0 as an official release and will start counting on from there for future updates.
PeerTube plugins and themes should be published on NPM so that PeerTube indexes take into account your plugin (after ~ 1 day). An official plugin index is available on packages.joinpeertube.org, which is used in the Admin interface of your PeerTube instance to search for, install and update your plugins and/or themes.